EnergyOS brings two jobs together: managing your energy systems remotely, and managing the devices that connect everything. This guide explains what each part does, how the pieces talk to each other, and how to set them up.
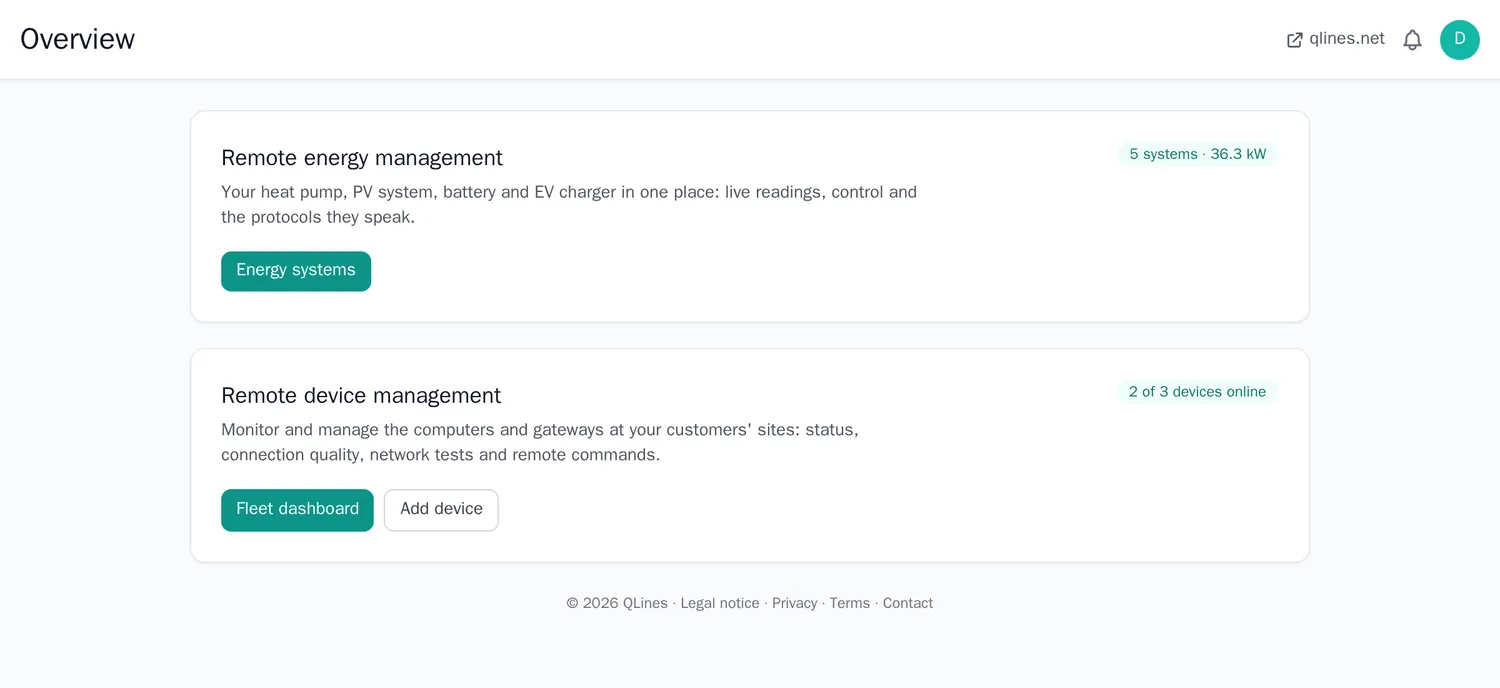
Getting started
- Create an account and sign in. The Free plan needs no credit card.
- Add your energy systems under Remote energy management → Energy systems (heat pump, PV, battery, EV charger), or create demo systems to look around first.
- Connect a device under Remote device management → Add device. It runs the EnergyOS agent next to your systems and reports its status (see the agent).
- Link each system to its device. The overview then shows whether it is online.
How EnergyOS fits together
EnergyOS never talks to your equipment directly. A small program at your site, the gateway or the agent, talks to the equipment and keeps one outgoing, encrypted connection to the EnergyOS message broker. Everything else happens through that connection.
| Part | Where it runs | What it does |
|---|---|---|
| Equipment | At your site | Heat pump, PV inverter, battery, EV charger, meters, sensors. Speaks its own protocol (Modbus, OCPP, KNX, Matter, a vendor API). |
| Gateway | At your site: a Raspberry Pi, mini PC, NAS or server | Translates between the equipment's protocol and EnergyOS messages. Home Assistant, evcc, Node-RED, zigbee2mqtt or a small script can all be the gateway. |
| EnergyOS agent | On a Linux device at your site | Reports the device's health (CPU, memory, disk, temperature), runs network tests and runs commands you send from the page. |
| MQTT broker | QLines | Receives and hands out messages. Every device has its own login and can only use its own topics. |
| EnergyOS | QLines | Shows the data, sends commands, runs rules and alerts, and shows the weather forecast and the electricity prices. |
Which one do I need? To read and control energy systems you need a gateway that speaks MQTT (see Connecting equipment). To watch and manage a computer (status, charts, network quality, remote commands) you install the agent (see The agent). One device can do both: the agent and Home Assistant can run side by side on the same Raspberry Pi.
Remote energy management
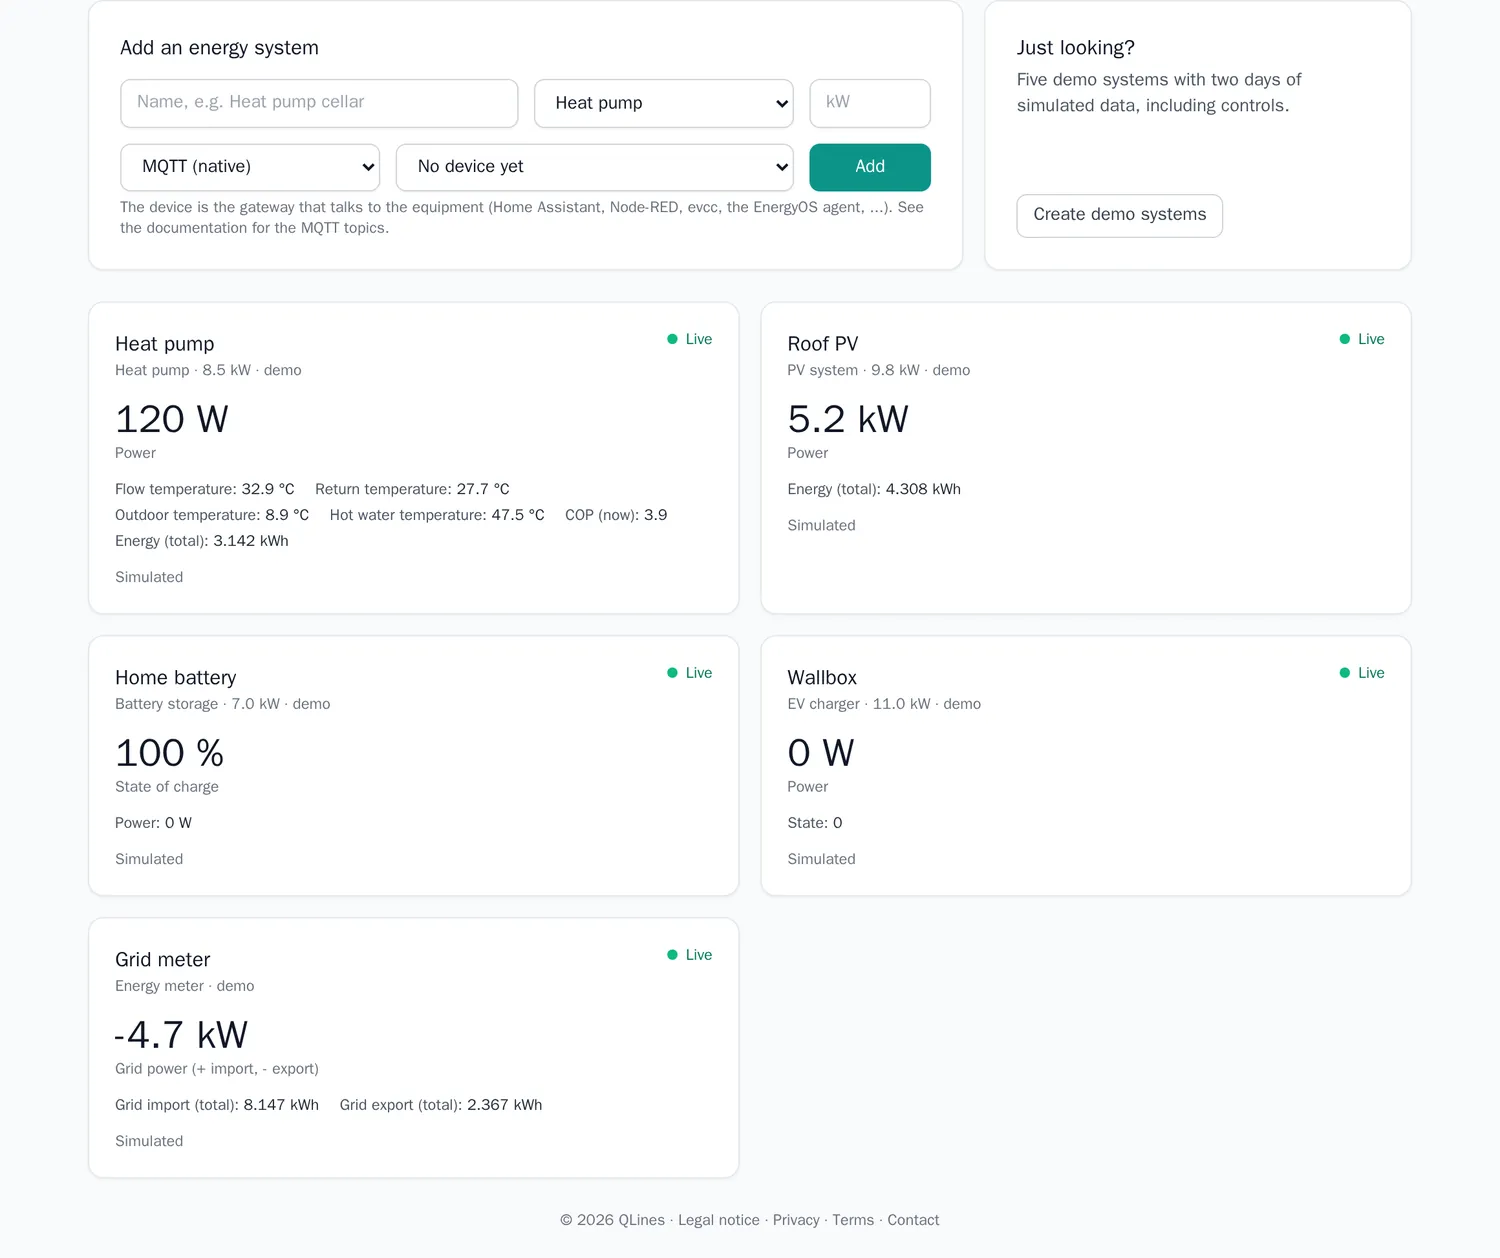
An energy system is one piece of equipment: heat pump, PV system, battery, EV charger, boiler, energy meter. For each you enter a name, the type, the rated power, how it is connected, and the device (the gateway) it is linked to.
- Overview: one tile per system with its main value and a live / no-data status. When PV, a grid meter or a battery report values, the energy flow is shown: PV, grid (import or export), battery, house consumption and the share you cover yourself.
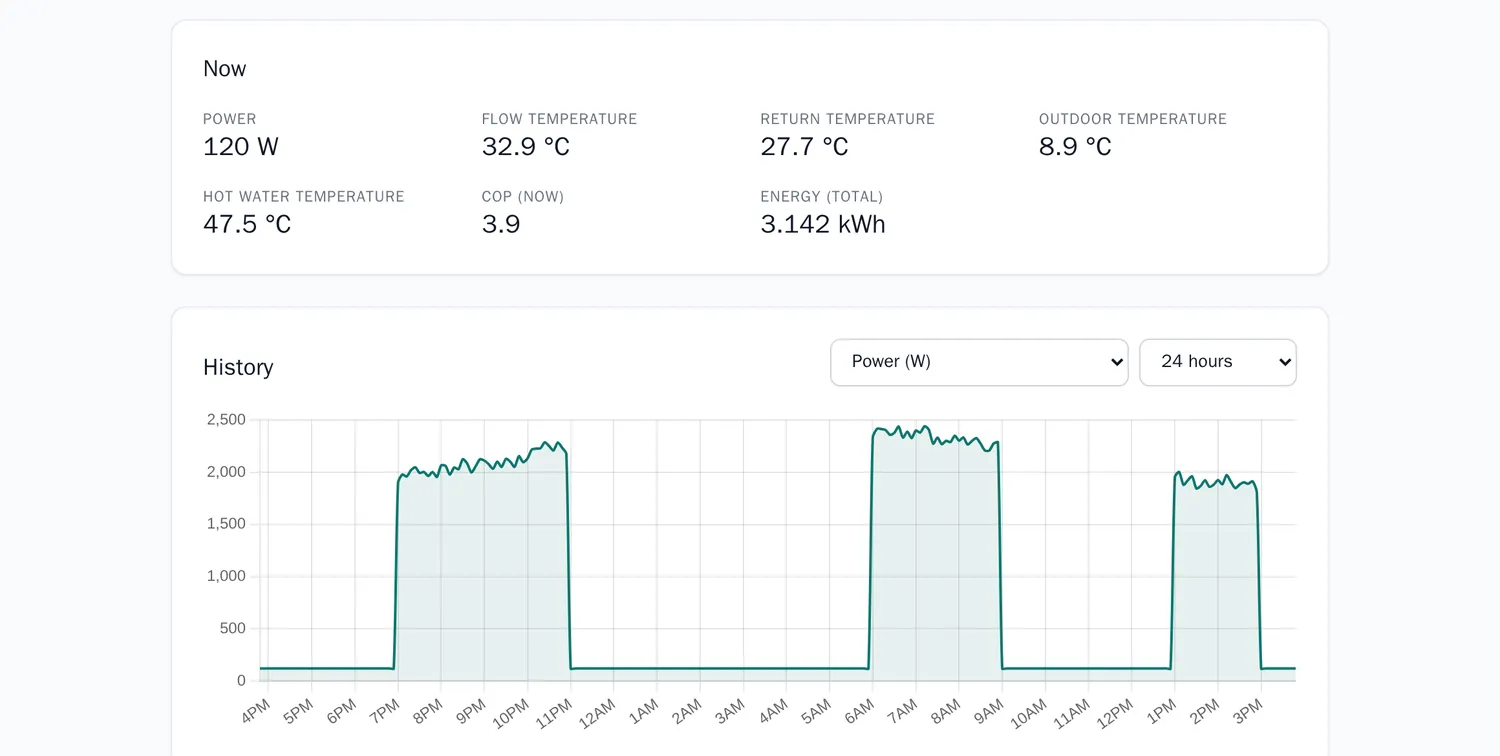
- System page: all latest values, a history chart (6 hours, 24 hours, 7 days, any channel), controls and the list of recent commands.
- Demo systems: Create demo systems adds five systems with two days of simulated readings and simulated commands, to look around or to record a video.

Controls
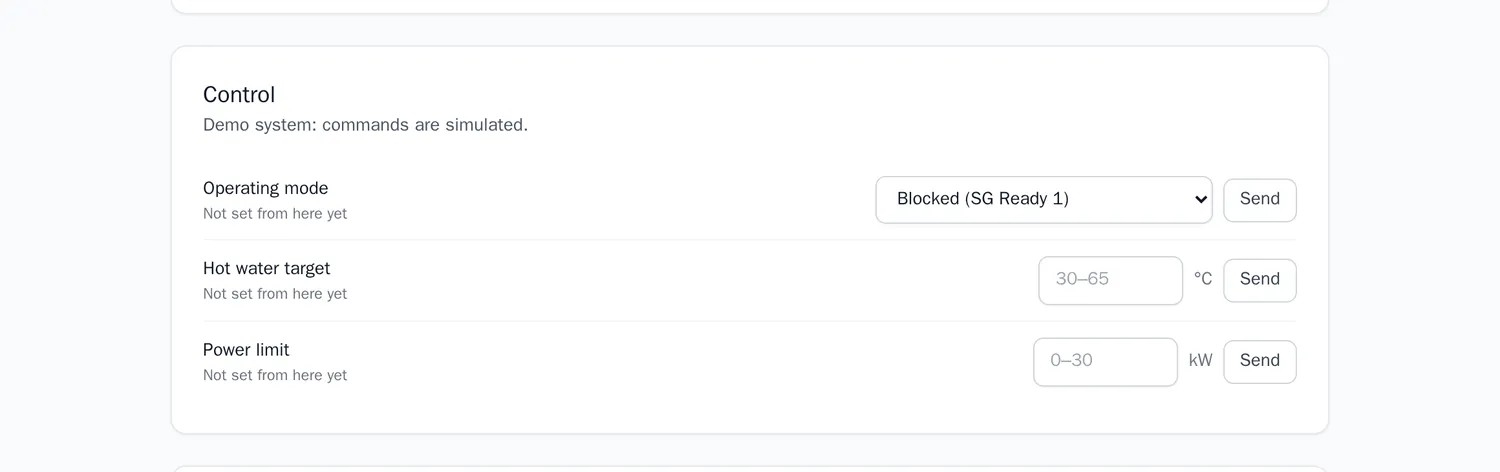
Controls depend on the type. Heat pump: operating mode (blocked, normal, recommended on, forced on, as in SG Ready), hot water target, power limit. EV charger: charging allowed, current limit, power limit. Battery: mode, maximum charge power. PV: feed-in limit. Boiler: flow temperature setpoint.
Connecting equipment (MQTT)
EnergyOS talks MQTT. A gateway sits next to your equipment, talks to it in its own protocol, and exchanges flat JSON messages with EnergyOS. Any program that can speak MQTT can be the gateway:
Home Assistant, Node-RED, evcc, zigbee2mqtt, a Matter server, or a small script. Use the MQTT login of the device the system is linked to: the device ID is the user name and the device token is the password,
over TLS on port 8883 (server mqtt.qlines.net).
publish   rc/{account}/{device}/energy/{system_id}        {"power_w": 4200, "soc_pct": 63}
listen    rc/{account}/{device}/energy/{system_id}/set    {"cmd_id": "...", "control": "mode", "value": "eco"}
confirm   rc/{account}/{device}/energy/{system_id}/ack    {"cmd_id": "...", "ok": true, "message": ""}
The system page shows these topics with your real IDs. Readings are numbers only (up to 40 channels per message), stored at most every 10 seconds and kept for 90 days; they count towards the daily message limit of the device.
| Channel | Meaning |
|---|---|
power_w | Power in W (battery: positive while charging) |
grid_w | Grid meter: positive = import, negative = export |
soc_pct | Battery state of charge in % |
temp_flow_c, temp_return_c, temp_outdoor_c, temp_dhw_c, cop | Heat pump values |
energy_kwh, energy_import_kwh, energy_export_kwh | Counters in kWh |
grid_limit_active | 1 while the grid operator limits controllable devices (§14a EnWG) |
Protocols
You choose how a system is connected so the setup is documented. EnergyOS itself speaks MQTT; the gateway translates:
| Equipment speaks | Gateway |
|---|---|
| Modbus TCP / SunSpec (inverters, batteries, meters) | Home Assistant, evcc, Node-RED, or a vendor MQTT option |
| OCPP (EV chargers) | evcc, or the charger's own MQTT interface |
| EEBUS, SG Ready (heat pumps) | Home Assistant or the heat pump's gateway; SG Ready is two relay contacts |
| KNX, Matter / Thread, Zigbee / Z-Wave (sensors, switches, plugs) | Home Assistant (KNX, Matter) or zigbee2mqtt, both publish to MQTT |
| Vendor cloud or HTTP API | A small script or Node-RED flow |
EnergyOS does not talk to the equipment itself. If a gateway does not confirm a command, the page says no confirmation and the setting is not assumed.
Weather forecast
On the energy page, enter the location of your systems once (town, postcode or address). EnergyOS then loads the weather forecast for the next 48 hours: the MOSMIX forecast of the German weather service (Deutscher Wetterdienst, DWD) for the nearest forecast point, through the Bright Sky service: outdoor temperature, solar radiation and cloud cover, refreshed every hour. From it EnergyOS shows:
- Coldest and warmest hour of the next 24 hours.
- Expected PV yield: solar radiation × installed kWp of your PV systems × 80 % performance ratio. A simple estimate without roof tilt and orientation, good enough to tell a sunny day from a grey one.
- Heating demand: degree hours below 15 °C outdoor temperature. More degree hours, more heat needed.
- PV today, expected versus measured: the forecast energy since midnight next to the energy your PV systems reported. Clearly below the forecast (under 70 %) points to shading, soiling or a fault.
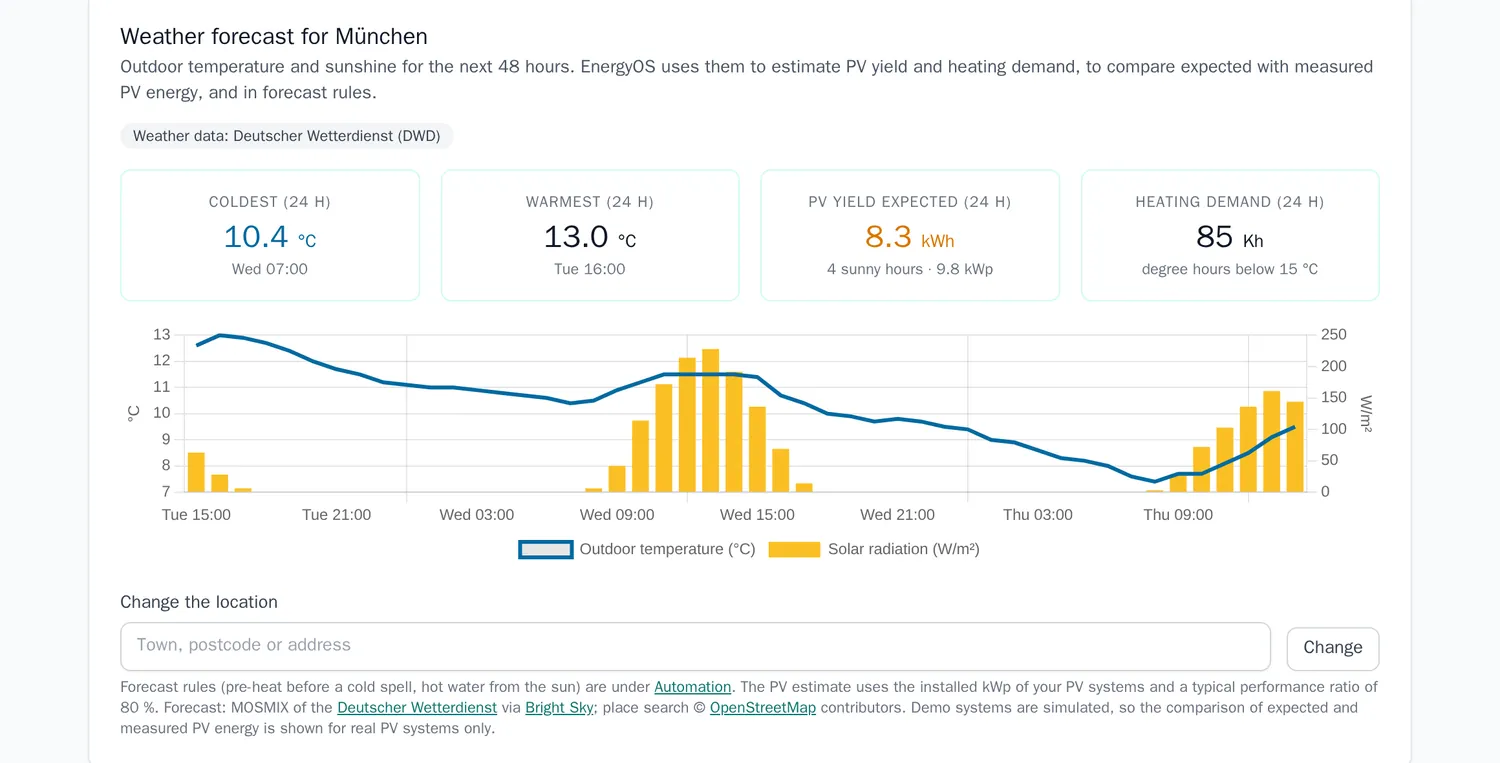
The forecast also drives two rules under Automation (see below). Demo systems use München as their location; their PV readings are simulated, so the expected-versus-measured line is shown for real PV systems only.
Automation and prices
Under Automation you see the German day-ahead electricity price for the next hours: now, lowest, highest, and the cheapest 3-hour window. The price is the market price without taxes, grid fees and supplier margin: good for comparing hours, not a bill. It comes from aWATTar, with Energy-Charts as a fallback.
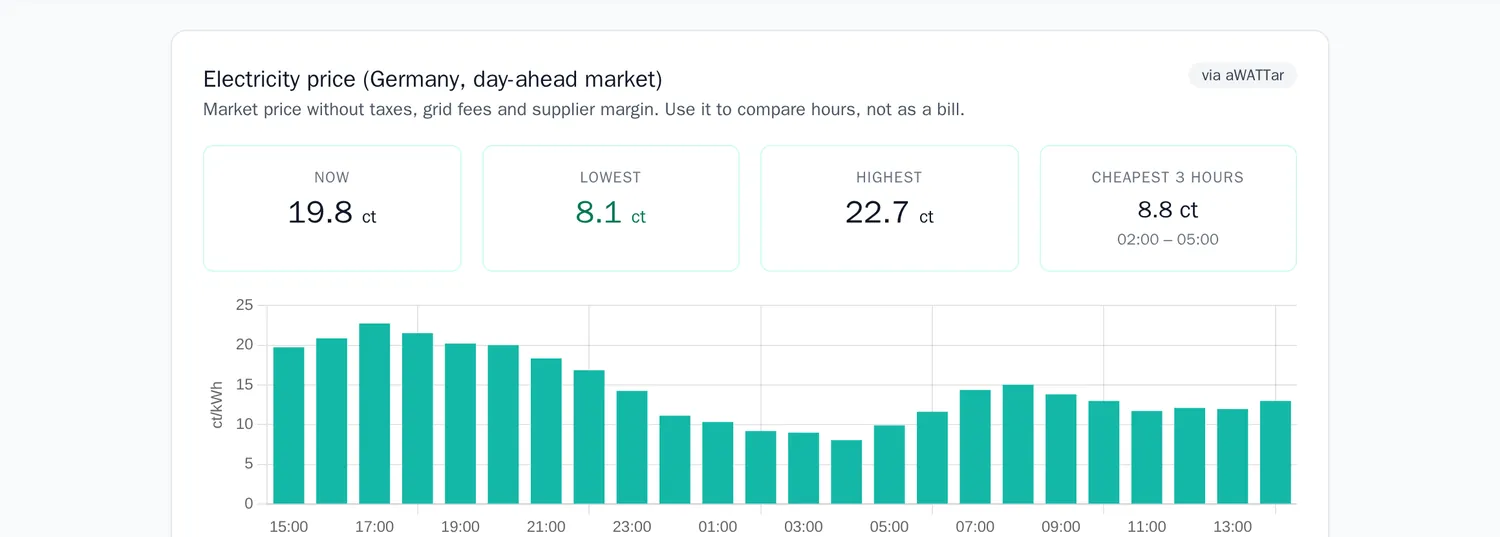
Rules switch a control when a condition starts and set it back when it ends. A rule changes at most every 5 minutes. Available rules:
- Use PV surplus for the heat pump: when the grid meter exports more than the threshold, set the heat pump to recommended on; back to normal afterwards.
- Charge the car with PV surplus: allow charging while the surplus lasts.
- Heat hot water when electricity is cheap: forced on while the market price is below the threshold (ct/kWh).
- Pre-heat before a cold spell (weather forecast): when the lowest outdoor temperature forecast for the next 12 hours is at or below the threshold (°C), set the heat pump to recommended on, so the building stores heat before the cold arrives; back to normal afterwards.
- Leave hot water to the sun when a sunny day is forecast: when the PV yield forecast for the next 24 hours reaches the threshold (kWh), lower the hot water target to 45 °C so the sun can heat it later; 55 °C otherwise. Needs at least one PV system with its kWp.
- Grid operator limit (§14a EnWG): while the gateway reports
grid_limit_active= 1, heat pumps and EV chargers are limited to 4.2 kW; the limit is lifted when the signal ends.
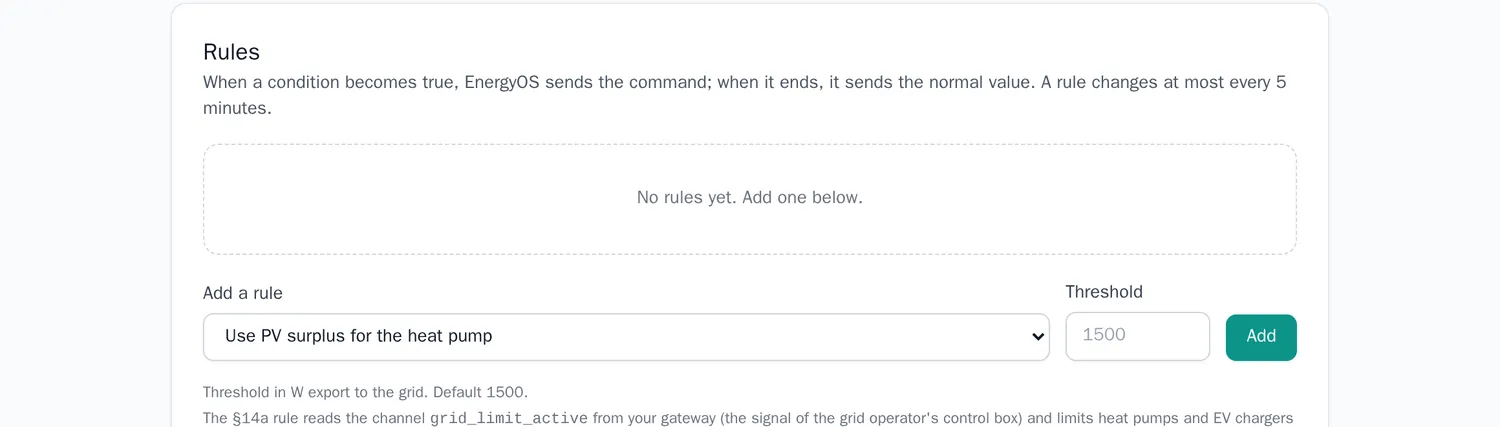
Rules need data: a rule that cannot see the values it needs does nothing (a forecast rule without a location or forecast, for example). You can pause or delete any rule.
Heat pump subsidy calculator
The federal subsidy for a heat pump in Germany (BEG EM, paid by KfW and BAFA) is not part of the EnergyOS dashboard. It is a free calculator on qlines.net that needs no account and stores nothing: Heat Pump Subsidy Calculator for Germany.
For Germany only. The calculator uses the German federal programme and applies to buildings in Germany. Subsidies in other countries follow different rules.
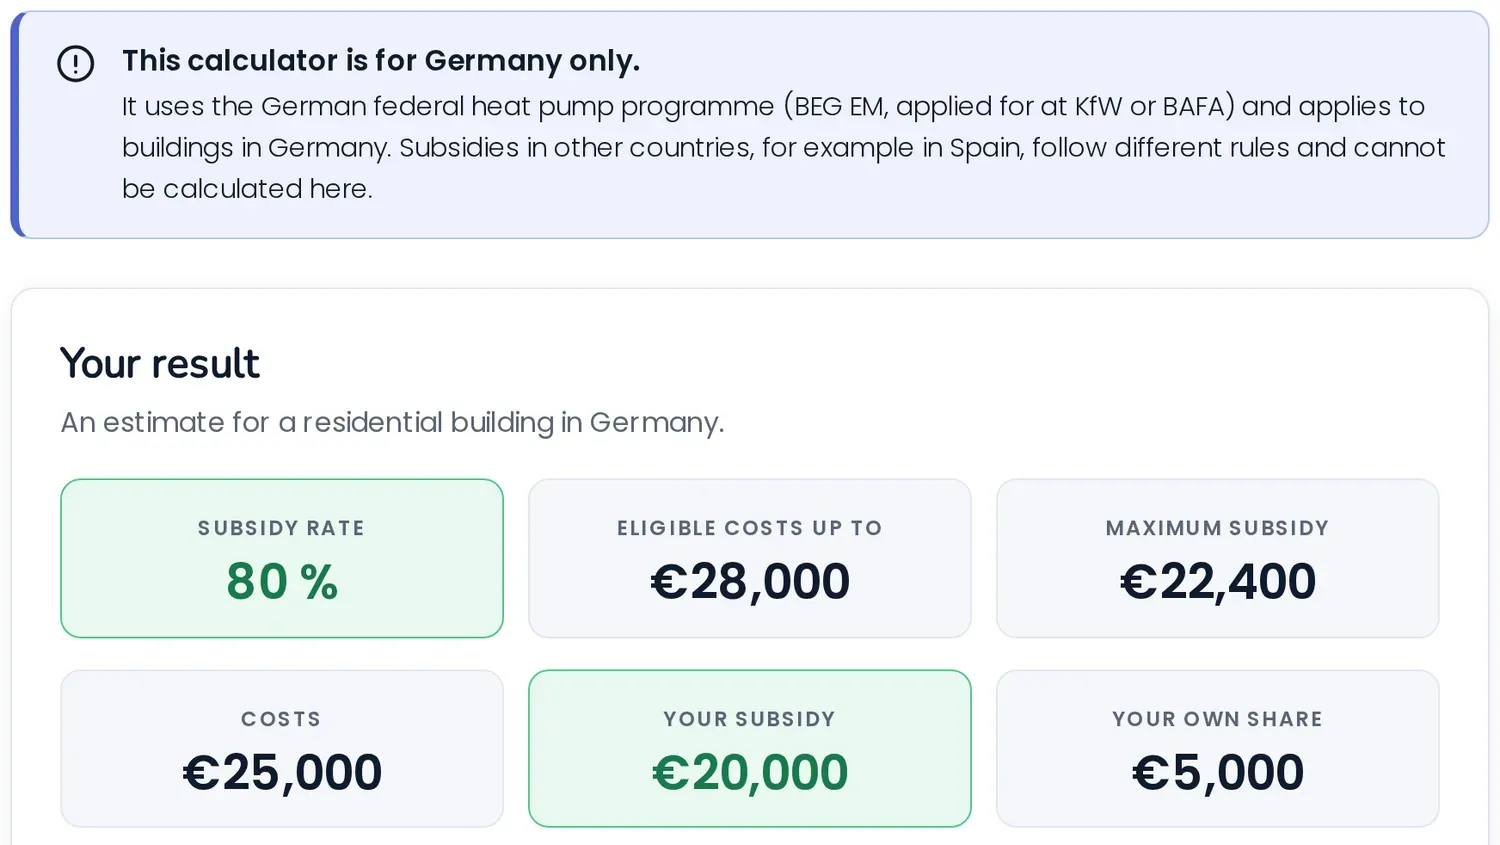
You enter the building type, the application date, the heating you replace and its age, whether you live in the building, your household income and the planned costs (or the heat pump size for a cost estimate). You get the subsidy rate, how it is built from the base subsidy and the bonuses, the maximum subsidy, your own share and, if you add your fuel use, the yearly saving and the payback.
The result is an estimate with the published rules, not a notice of grant. KfW (private owners) or BAFA decide on the application.
Remote device management
Add a device to get its status, connection quality, network tests and remote commands. The Fleet dashboard shows all devices at a glance: how many there are compared with your plan, how many are online and offline, and how many alerts are open. Each card shows the status, when the device was last seen, CPU, memory and disk use, and the latest ping. Use the filter box and the sort menu to find a device.
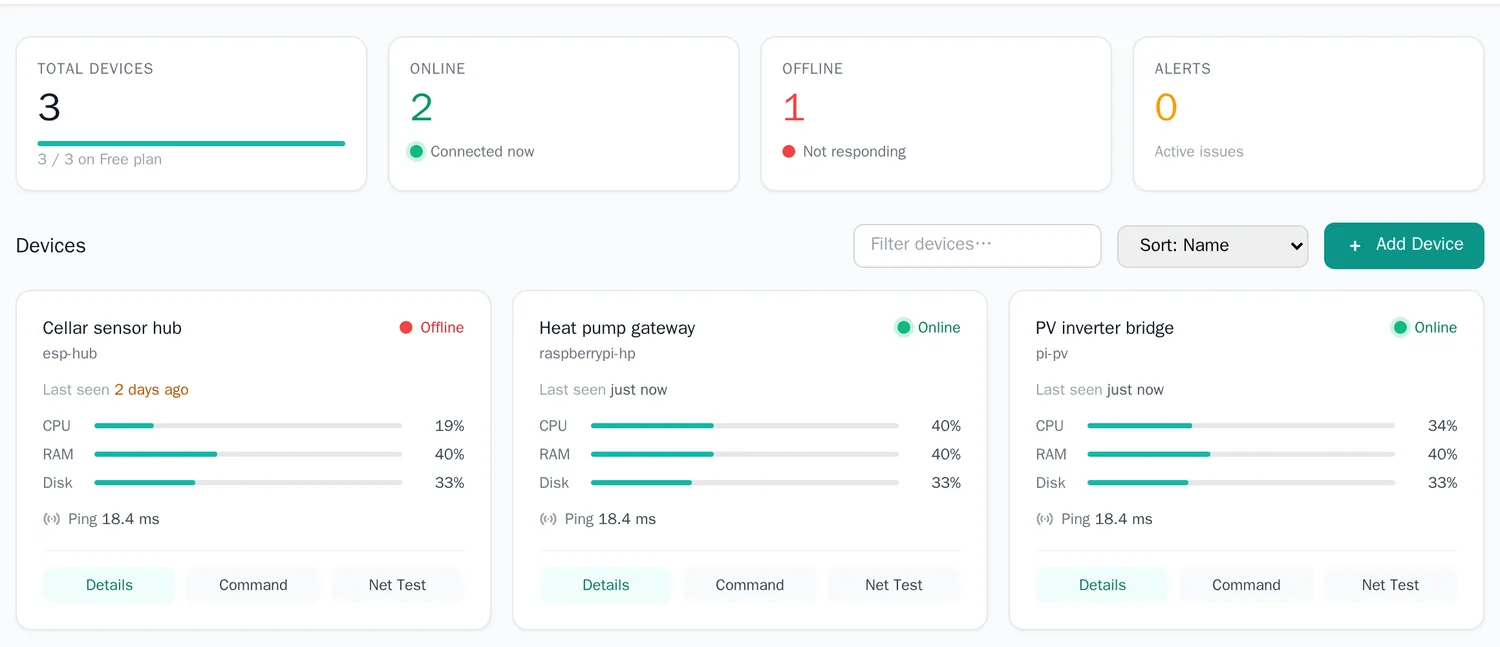
Status and last seen
Last seen says how long ago the device last reported, for example 5 min ago or 3 days ago, and updates by itself while the page is open. Hover over it to see the exact time in your time zone. Under a minute reads just now; after a day the text turns amber, so a forgotten device stands out.
The device page
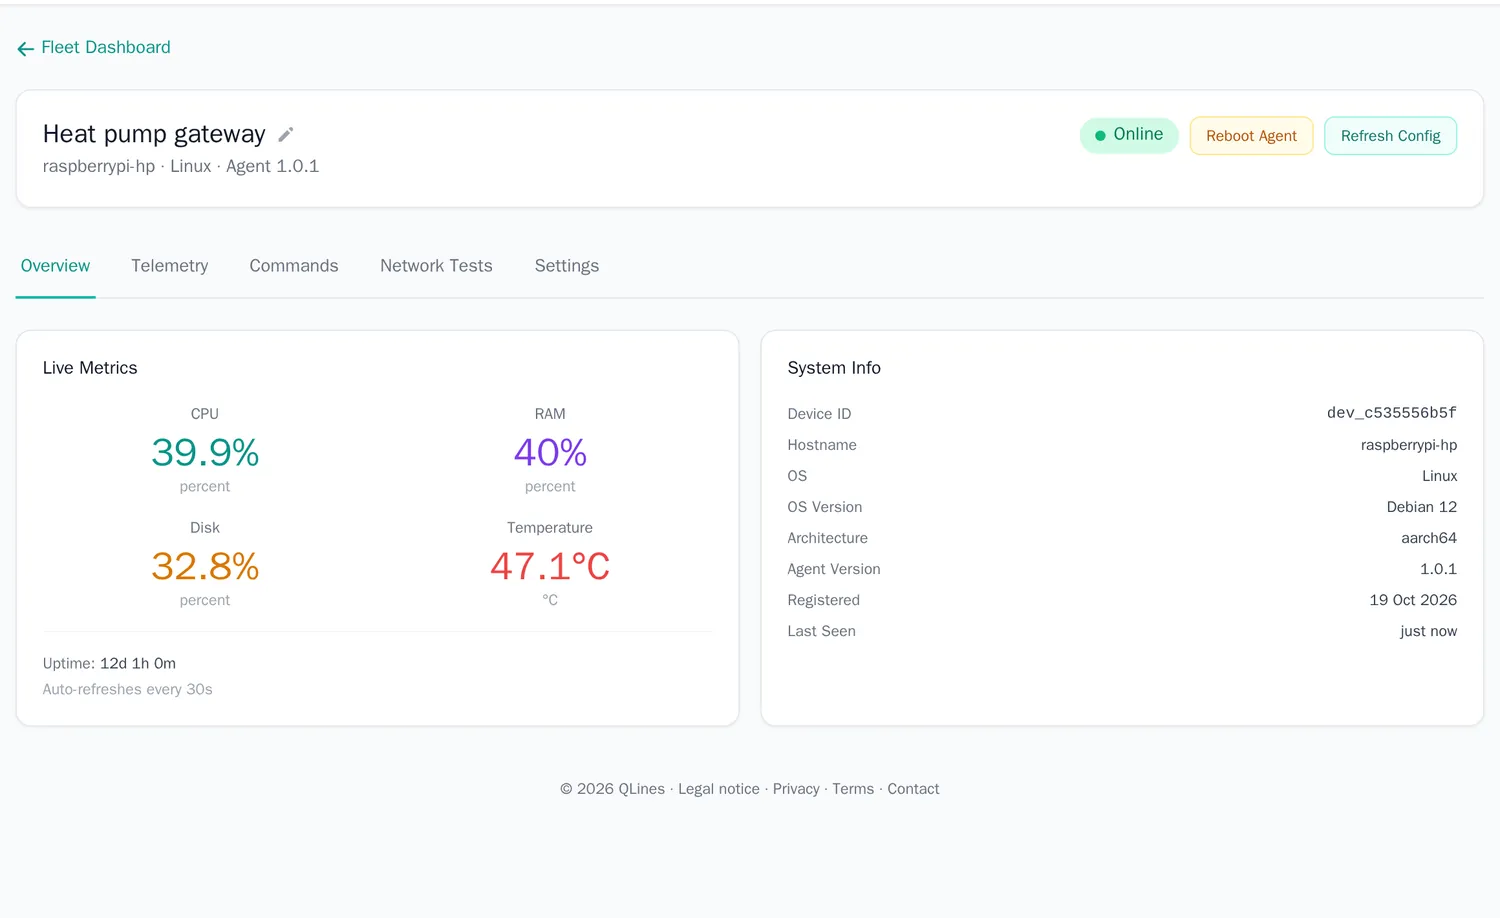
- Overview: live CPU, memory, disk and temperature, and the system details: device ID, host name, operating system, architecture, agent version, registration date, last seen and uptime.
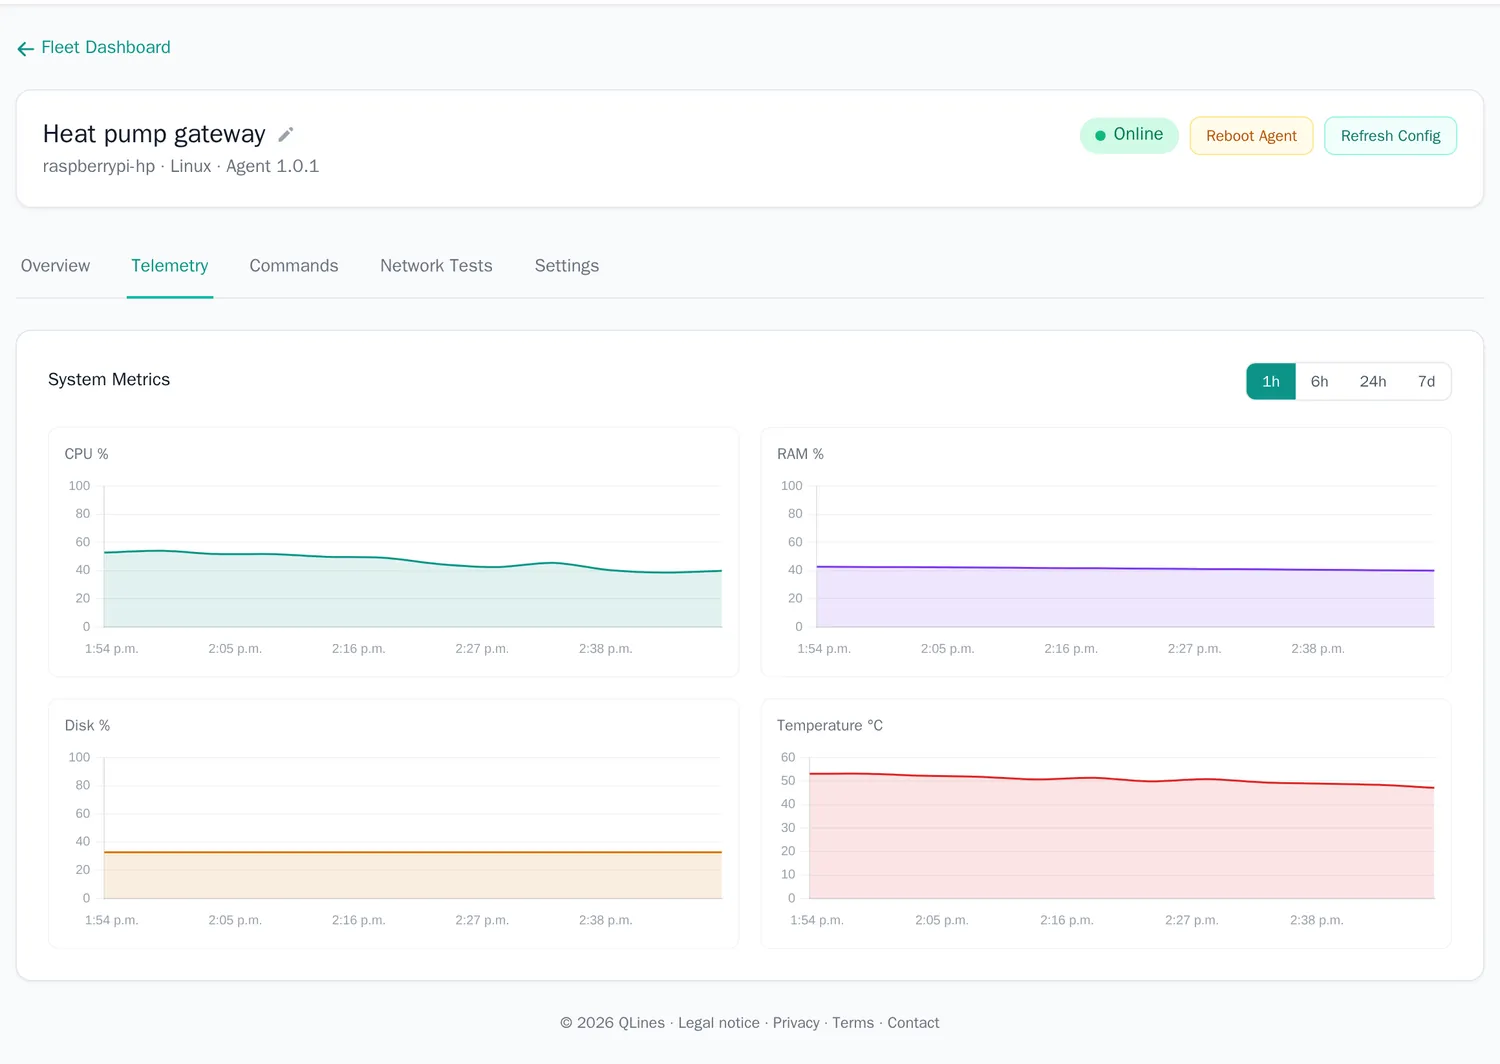
- Telemetry: charts of CPU, memory, disk and temperature for 1 hour, 6 hours, 24 hours or 7 days.
- Commands: run a command on the device and see the result (see Remote commands).
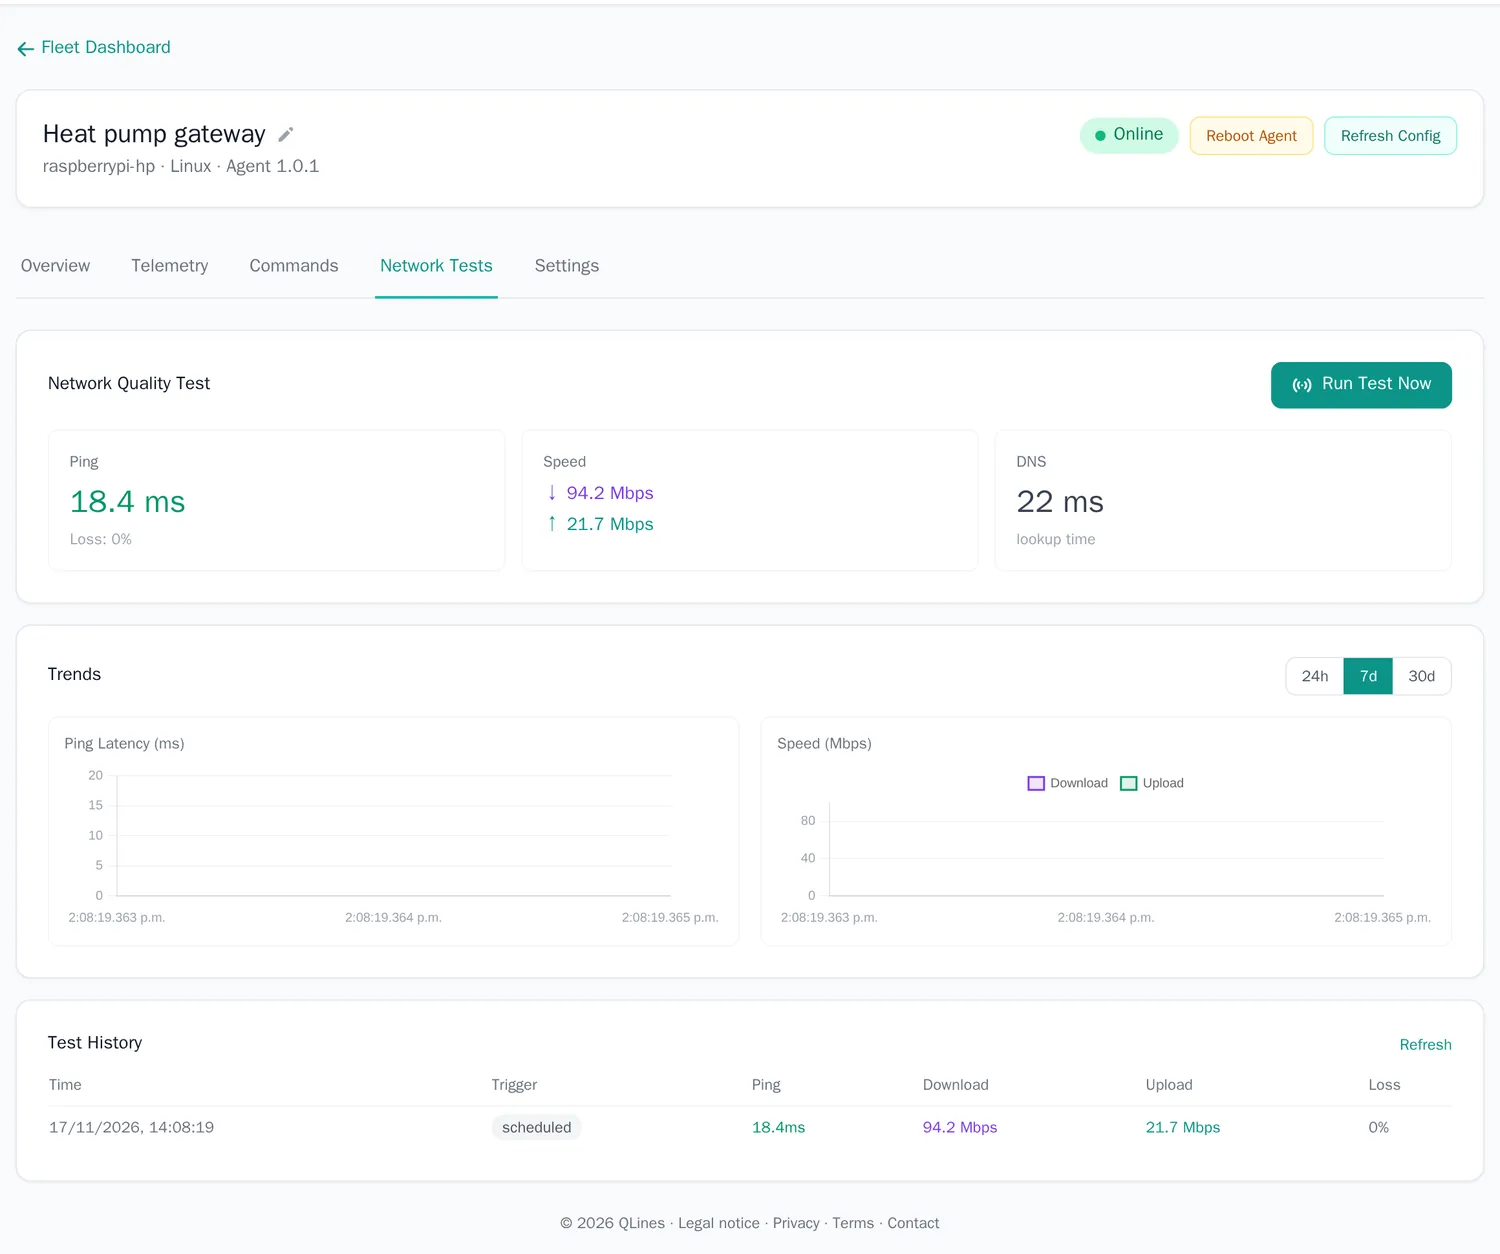
- Network tests: ping, download and upload speed, DNS lookup time and HTTP checks, on a schedule or on demand with Run test now.
- Settings: name and notes, the heartbeat interval (15, 30 or 60 seconds), the telemetry interval (30 seconds to 15 minutes), the network test schedule and the enabled features. Save and Refresh Config send the new settings to the agent.
Alerts
EnergyOS opens an alert when a value crosses its threshold. Open alerts are counted on the bell at the top right and on the Fleet dashboard. An alert closes by itself when the value is back to normal.
| Alert | Opens when |
|---|---|
| Device offline | No heartbeat for 2 minutes |
| High CPU | CPU above 90 % |
| High temperature | Temperature above 80 °C |
| High disk use | Disk above 90 % |
| High latency | Ping average above 200 ms in the latest network test |
| Packet loss | Any packet loss in the latest network test |
Alerts show in the app. E-mail notices are off by default; contact us if you want them for your account.
The agent: install and requirements
The EnergyOS agent is a small Python program for Linux devices (Raspberry Pi, mini PCs, servers). It keeps one outgoing MQTT connection to EnergyOS, reports the device's health and runs the network tests and commands you start from the page. It is not needed for connecting energy equipment; that is the gateway's job (see How EnergyOS fits together).
Requirements
| What | Needed |
|---|---|
| Operating system | Linux. systemd is recommended to run it as a service. Raspberry Pi OS, Debian and Ubuntu are the usual choices; ARM and x86 both work. |
| Python | Version 3.9 or newer |
| pip | Installed by the installer if it is missing (through apt, dnf, yum, pacman, apk or the official get-pip script) |
| Libraries | paho-mqtt, psutil, PyYAML, speedtest-cli, requests and schedule. The installer fetches them. |
| Rights | None to install and run as your own user. sudo only for rc-agent install-service and, if you want it, to install pip. |
| Network | Outbound only: HTTPS (port 443) to www.qlines.net for the install and for the one-time init, then MQTT over TLS (port 8883) to mqtt.qlines.net. pip also reaches PyPI. The clock must be right, or the TLS check fails. |
| For the network tests | The ping command, and outbound access to 8.8.8.8, google.com and cloudflare.com |
| Size | A light background process; a Raspberry Pi is plenty |
Install
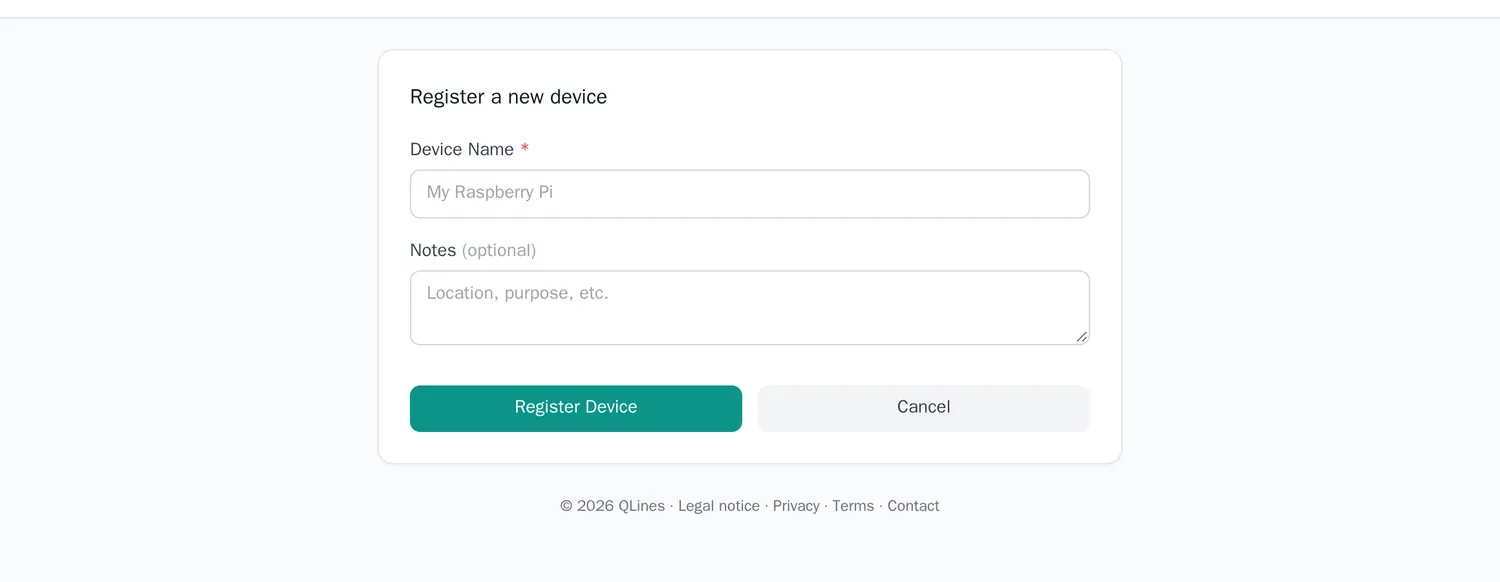
- In EnergyOS choose Add device, give it a name and register it. Copy the token; it is shown once.
- On the device run the installer with your token:
curl -sSL https://www.qlines.net/install/rc-agent | bash -s -- --token tok_xxxxxxxx - Start the agent:
rc-agent start - To keep it running after you log out and after a reboot, install it as a service:
sudo rc-agent install-service
sudo systemctl start remotecontrol-agent
On Debian 12 and Raspberry Pi OS the system Python is "externally managed". The installer then adds pip's --break-system-packages flag. If you prefer to keep the agent separate,
create a virtual environment first (python3 -m venv ~/rc-agent-env), install the package into it with that environment's pip
(https://www.qlines.net/install/remotecontrol-agent.tar.gz) and start ~/rc-agent-env/bin/rc-agent.
What is installed where
| What | Where |
|---|---|
rc-agent command | ~/.local/bin (user install) or /usr/local/bin (installed as root) |
| Python package and libraries | The site-packages folder of the Python the installer used |
| Settings (ID, token, server) | ~/.config/remotecontrol/config.yaml; as a service /etc/remotecontrol/config.yaml (readable by the service user only) |
| Service | /etc/systemd/system/remotecontrol-agent.service, running as the system user remotecontrol (no login, no home folder) |
| Running-process marker | /tmp/remotecontrol-agent.pid |
| Log | The terminal; as a service journalctl -u remotecontrol-agent |
The settings file holds the device token in plain text. Protect it: chmod 600 ~/.config/remotecontrol/config.yaml. If a token leaks, use Regenerate Token in the device settings: the old one stops working.
What the agent and EnergyOS say to each other
All messages are small JSON documents on topics under rc/{account}/{device}/. The agent starts every conversation: it connects, subscribes to three topics
(config, cmd/request, nettest/trigger) and publishes what it has. EnergyOS answers on the topics the agent listens to.
Topic (under rc/{account}/{device}/) | Direction | Content |
|---|---|---|
register | agent → EnergyOS | Agent version, host name, system, architecture, Python version |
config | EnergyOS → agent | Heartbeat and telemetry interval, enabled features, network test schedule |
heartbeat | agent → EnergyOS | "Still here", every 30 seconds by default |
telemetry/system | agent → EnergyOS | CPU, memory, disk, temperature, uptime, load; every 60 seconds by default |
nettest/trigger and nettest/result | both | Start a network test now; its result (ping, DNS, HTTP checks, speed) |
cmd/request and cmd/response | both | The command to run; its output, error text, exit code and duration |
Commands of the agent
| Command | What it does |
|---|---|
rc-agent init --token … --server mqtt.qlines.net | Checks the token with EnergyOS and writes the settings file |
rc-agent start | Runs the agent in the foreground |
rc-agent status | Shows whether it runs and a summary of the settings |
rc-agent test-nettest | Runs one network test and prints the result |
sudo rc-agent install-service | Creates the service user, copies the settings to /etc/remotecontrol and installs and enables the systemd service |
Remove the agent
- Stop and remove the service, if you installed it:
sudo systemctl disable --now remotecontrol-agentand delete/etc/systemd/system/remotecontrol-agent.service. python3 -m pip uninstall remotecontrol-agent, and delete the settings folder.- Delete the device in EnergyOS. This also removes its login at the broker.
Remote commands
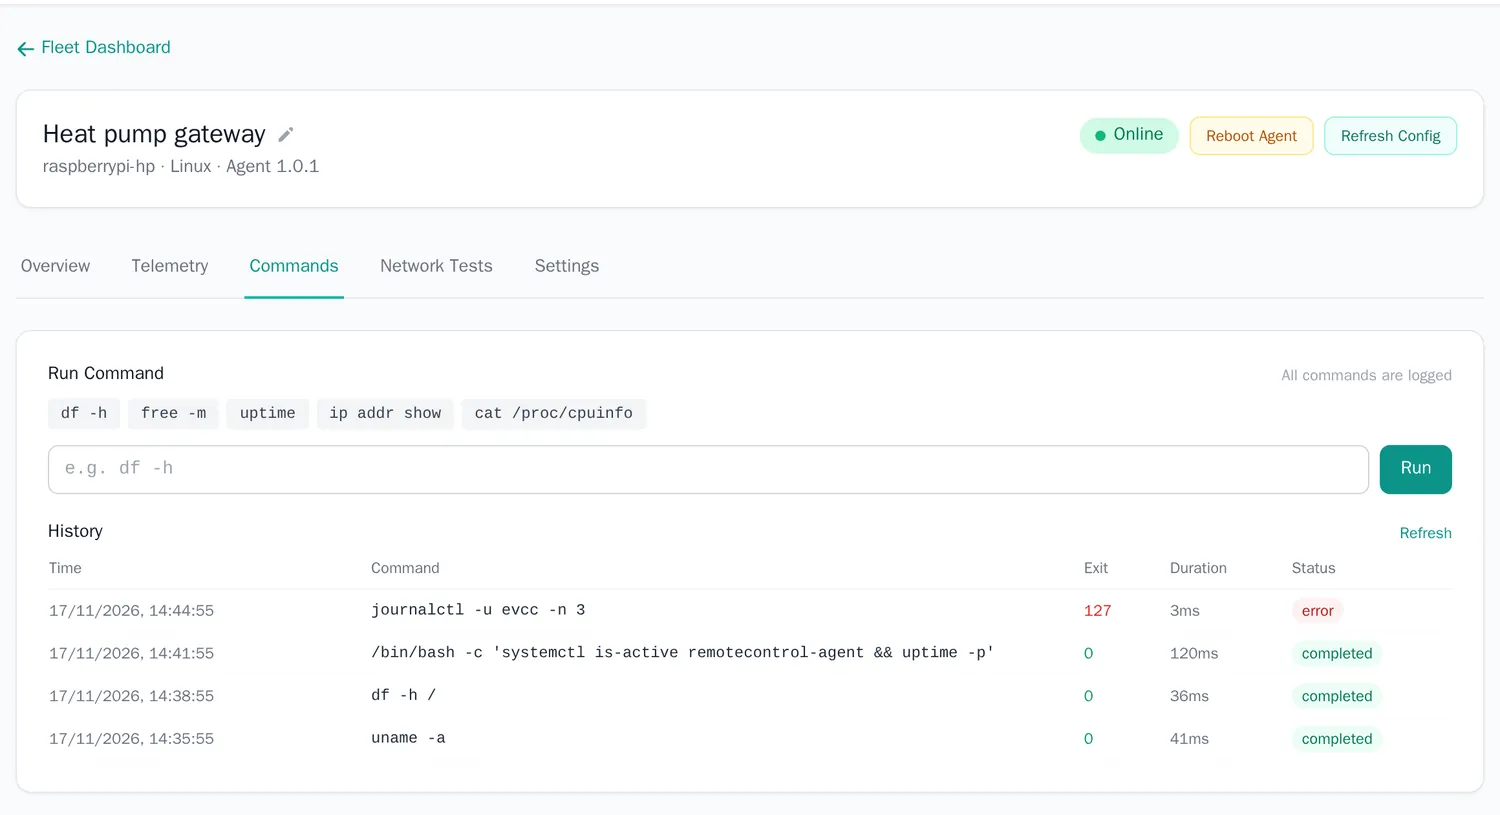
On the Commands tab of a device you can run a command on the device and read the answer. Commands go through the agent, only while the device is online, and every command is logged with who sent it, when, the exit code and the duration.
How a command runs
The agent does not start a shell. It splits your text into words the way a shell would (quotes work) and starts the program directly, as the user the agent runs as. That is safer, and it explains why only some things work as typed.
| You type | Result |
|---|---|
df -h /, uname -a, uptime | Works: a program and its arguments |
df -h | head -2, a && b, ls > file, ls *.log | Does not work as written: pipes, &&, redirects and wildcards belong to a shell |
cd /tmp, export X=1, echo $HOME | Does not work: these are shell built-ins and variable expansions |
/bin/bash -c 'df -h | head -2' | Works: you ask for a shell yourself, and it runs the whole line |
sudo reboot | Works only if the agent's user may run it without a password (see below) |
| A program that waits for input, or runs longer than 30 seconds | Stopped after 30 seconds, together with anything it started. The input is closed, so nothing can ask a question. |
| A very long output | Cut at 64,000 characters per stream, with a note |
In short: a command uses the agent's own user and environment. As a service that is the remotecontrol user with a minimal PATH and no login profile.
To use your own environment, run /bin/bash -lc '…' for a login shell, call programs by their full path (for example the venv/bin/python path), or add Environment= lines to the service.
Which environment a command sees
A command runs as the user that runs the agent, with the environment of the agent process: its PATH, its HOME, its working folder and its variables.
It does not read .bashrc or .profile, because no login shell is involved.
- Started by hand (
rc-agent start): the environment of that terminal, including an activated virtual environment. - Started as a service (
install-service): the system userremotecontrolwith the minimal environment systemd gives a service (a shortPATHsuch as/usr/local/sbin:/usr/local/bin:/usr/sbin:/usr/bin:/sbin:/bin). It is not your login user, has no home folder and is not in thesudogroup.
Using your own environment
| You want | Do this |
|---|---|
| To see what the agent sees | Run env and whoami as commands |
Your login environment (.profile, PATH additions) | /bin/bash -lc 'your command' (a login shell of the agent's user) |
| A program from a virtual environment | Give the full path: /home/pi/venv/bin/python /home/pi/check.py |
| Permanent variables for every command | As a service: sudo systemctl edit remotecontrol-agent, add [Service] and Environment="NAME=value" (or EnvironmentFile=/etc/remotecontrol/env), then restart the service. By hand: set them before rc-agent start. |
| Commands as another user | Run the agent as that user (edit User= in the service), or allow exactly the commands you need with a sudoers rule for the remotecontrol user |
| A restart of the device | The Reboot Agent button sends sudo reboot. Allow it with a sudoers file such as remotecontrol ALL=(root) NOPASSWD: /usr/sbin/reboot, /usr/bin/systemctl reboot |
Everyone who can sign in to your EnergyOS account can run commands on every device in it. Give the agent's user only the rights it needs, never make it root for convenience, and protect the account with a strong password.
Security and privacy
- Encrypted: all MQTT traffic uses TLS (port 8883), and the agent checks the server's certificate. The website and the agent's one-time token check use HTTPS.
- One login per device: the device ID is the user name and the token the password. A device can only publish and listen on its own topics, so one device cannot read or control another.
- No inbound connections: equipment stays behind your router. The gateway and the agent connect outwards.
- Tokens: stored hashed at EnergyOS. A lost or leaked token is replaced with Regenerate Token in the device settings (the agent disconnects until it is set up again); deleting a device removes its login at once.
- Private by account: energy systems, readings, devices and commands belong to your account only.
- Weather and place search: only the location text you type, and the coordinates found from it, are sent to the weather and place services; no account data.
- Backups: data is backed up every night. Deleted data leaves the backups as they roll over, within six months.
Account, plans and limits
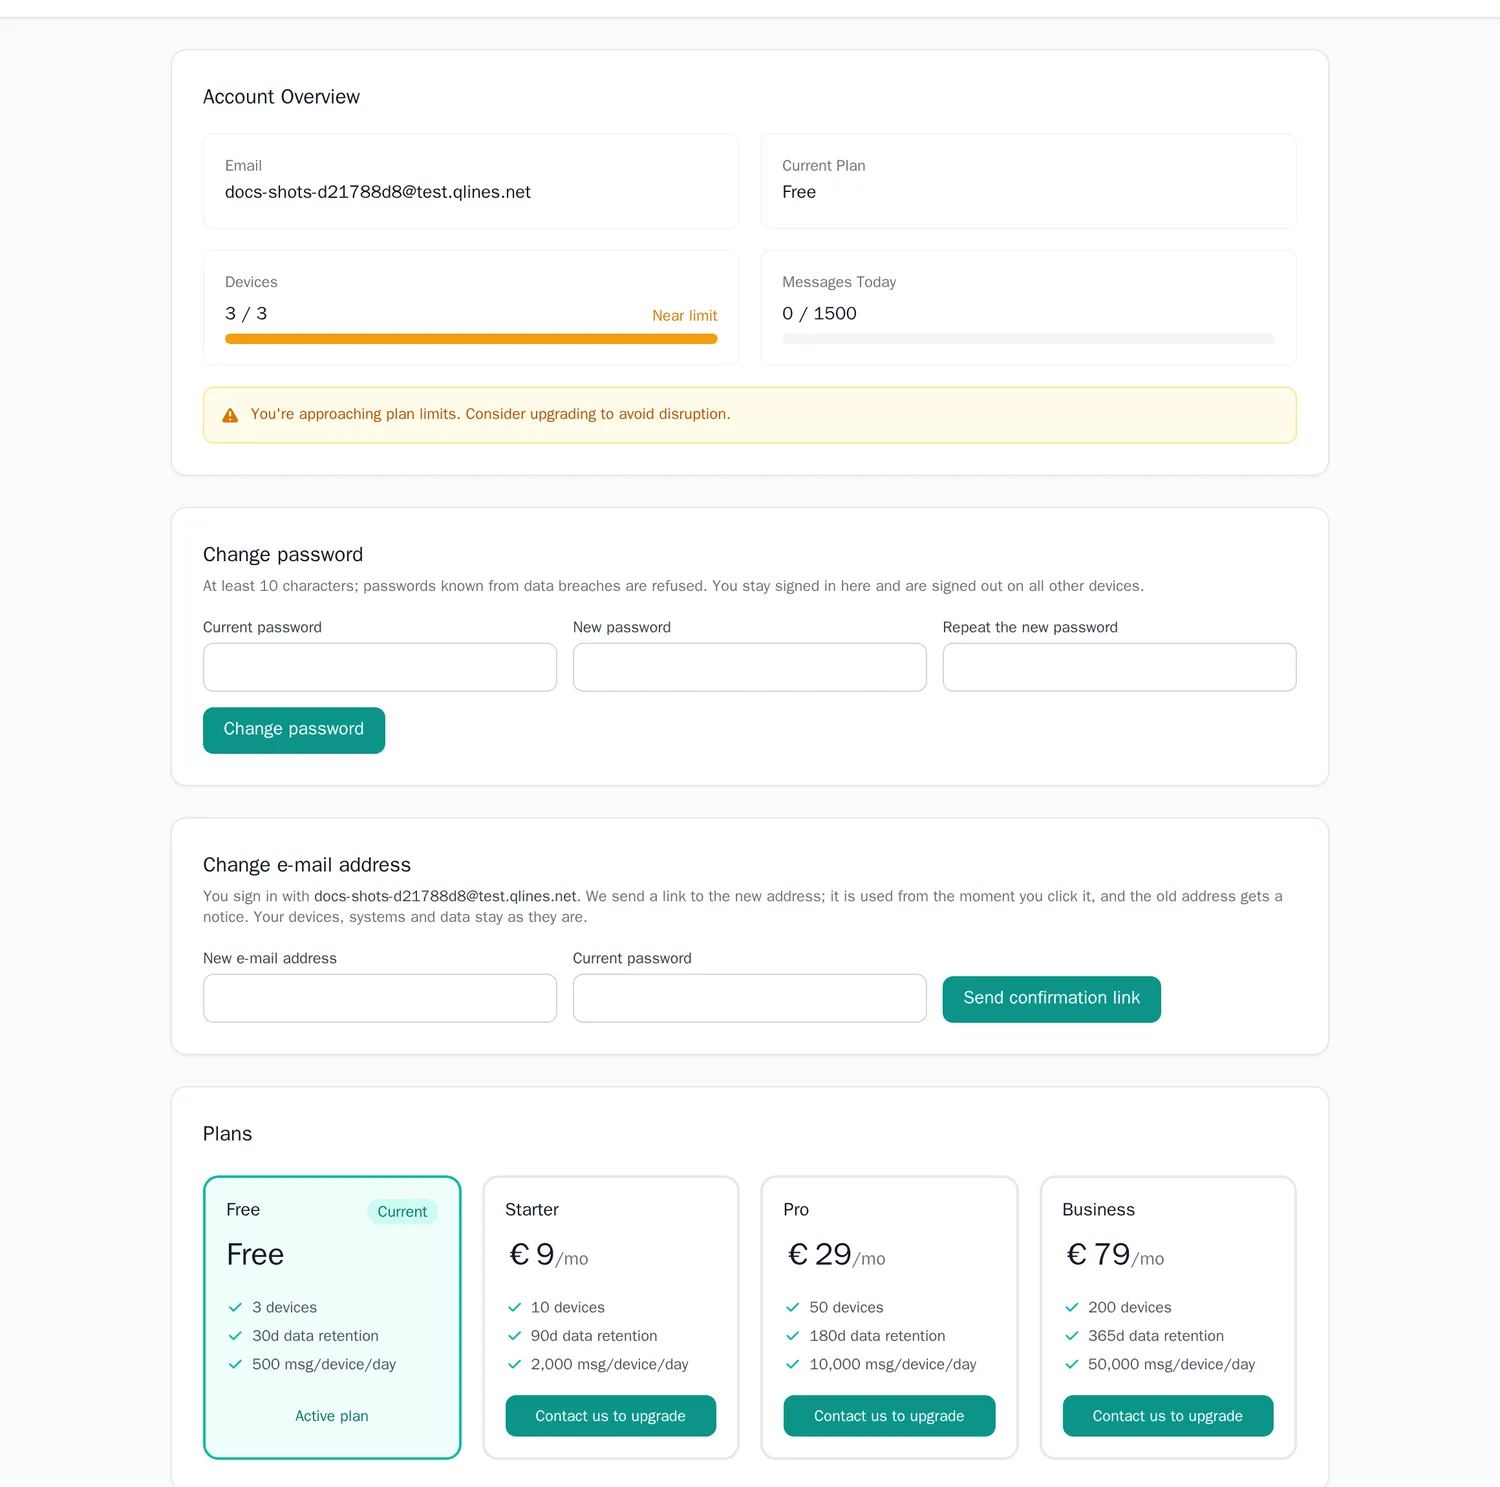
Under Settings you see your plan and how much of it you use (devices and today's messages), change your password and e-mail address, compare plans and, if you wish, delete your account.
| What | Limit |
|---|---|
| Devices, messages per device per day, data retention | Depend on your plan; see Pricing and the plan cards in Settings |
| Energy systems per account | 30 |
| Automation rules per account | 20 |
| Energy readings | 1 per system per 10 s, kept 90 days; commands kept 180 days |
Data is backed up every night.
Questions and troubleshooting
I forgot my password. What now?
On the sign-in page choose Forgot password? and enter your e-mail address. The link in the e-mail is valid for one hour and works once. Signed in, you change the password under Settings → Change password. A new password signs you out on all other devices.
How do I change my e-mail address?
Under Settings → Change e-mail address, with your current password. We send a link to the new address; once you click it (within 24 hours), you sign in with the new address and all mail goes there. The old address gets a notice. Devices, systems and data stay as they are, installed agents need no change.
How do I delete my account?
Under Settings → Delete account, with your current password. Everything is deleted right away: devices are disconnected and removed, together with energy systems, readings, rules, settings and the activity log. Copies in our backups are deleted as the backups roll over, within six months. Your UtilityControl account, if you have one, is separate.
The installer says "Python 3.9+ not found".
Install a current Python 3 (sudo apt install python3 python3-pip on Debian-based systems) and run the installer again.
The agent starts but the device stays "Never connected" or "Offline".
- Check the log (
journalctl -u remotecontrol-agent -for the terminal). "MQTT connect refused" means the token does not match this device: use Regenerate Token in the device settings and runrc-agent initagain with the new token. - Check that the device can reach
mqtt.qlines.neton port 8883 (outbound), and that its clock is correct. - Some company networks block port 8883; ask the network owner to allow it outbound.
A command says "Executable not found".
The program is not in the agent's PATH. Use its full path, or see Using your own environment.
A control says "no confirmation".
The gateway did not answer in time. Check that it runs and listens on the …/set topic of that system, and that it publishes on …/ack. EnergyOS does not assume the setting worked.
Is the subsidy calculator result binding?
No. It is a calculation with the published rules. The grant decision is made by KfW or BAFA.
The subsidy rules changed. What now?
The rules are stored as data and updated by us; the result page shows the date they were last checked.